Thursday, March 22, 2012

Wiring the Electric Motor

Once the motor was installed, Carter set about running the 1/0 welding cable from the batteries in the center bilge to engine room where the motor and controller are.  First he had to run large wires to the engine room, then create the connections for the control box.

Here the wires are in the mechanical room adjacent to the bilge compartment with the batteries.
From the mechanical room they pass thru a structural bulkhead and run under the
kitchen sink in the galley.

This shows the wiring under the galley sink and going thru the cabint behind the stove.


And finally they go thru another concrete and steal structural bulkhead into the engine room right at shelving where they connect to the controller and then to the motor. 

But first, Carter will finish preparing the control board. Here the controller is mounted on an aluminum heat sink before all the control wiring is connected.

Here, Carter is making a termination on one of the welding cables. Each one is pressed on with a hammer and then soldered for a good connection.

And then a piece of shrink wrap to cover up the messy connections.

Before he can finish the motor Carter has to reroute the fuel line to the diesel engine because it was in the way of the chain.


Not a lot of extra room to move around the engine but it could be worse.
 For a boat this is actually a pretty spacious engine room.

Close up of the motor with the wiring installed.

Here you can see the controller on the shelf with the electric motor on the left by the engine.

Just a few more details in the mechanical room and then we'll start her up!

Stay tuned.


Saturday, March 10, 2012

The Electric Motor

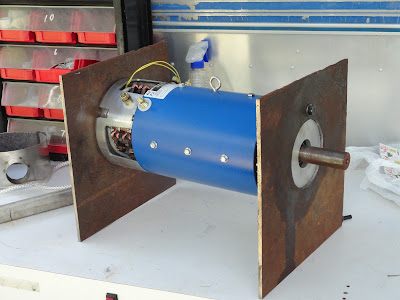
While we are waiting for our sample linear actuator to arrive so we can put the finishing touches on the solar array Carter decided to focus on mounting the electric motor. This has been a high anxiety project because Carter wasn't sure exactly how he was going to do it. He has worked steady for the past week fabricating the mounting brackets and figuring out how to install the thing.

With an idea in mind he started out cutting two 1/4" metal plates for each end of the motor.


After shaping them to fit better he mounted two pieces of angle on each side.

Getting the mount lined up with the drive train was critical. There where a lot of weird angles with the hull of the boat sloping up and the drive line sloping down it was going to be tricky getting the shaft properly aligned.

He fastened a piece of aluminum to drive train sprocket to line up the support angle. This worked well.

Lugging the 100+ pound motor into the engine room was a chore.

But actually getting it mounted to steel supports in the engine room was a nightmare.

Blocking, shimming, drilling, bolting.

The chain lined up perfectly.


Dirty, sweaty, skinned knuckles, and sore back but success.
Now comes the hard part, wiring the darn thing up.

Friday, March 2, 2012

More Solar Power!

We are moving ahead after our near sinking by adding more panels to the array!  We now have installed 8 of the total of 12 panels and I am PLEASED to announce that we are totally reliant on solar power for the house power!  This is a huge milestone for us.  No more stinking generator! 

It turned out to be a fairly breezy day but not enough to stop the planned activities.  The panels have to go up starting today because we must make a very necessary trip to the marina soon.  Thankfully we had no mishaps.

Day 1 - February 26th  -  Port Side

This is where we left off...2 panels on each side.  In this picture you can see the scoffolding that Carter set up for himself to use during the installation.  The panel must be in the full upright position in order for Carter to get the bolts in, so scaffolding is a must.

Introducing our new neighbor, Cracker Jack.  He's such a cool boat dog.  His owner passed away and our neighbor Pat saved him from the pound, where the family was going to put him!  Pat's a lucky man.

Getting ready for panel #3.  Carter called in our friend Garrett to assist with the heavy lifting.


Panel #4 coming aboard.

Panel #4 goes up.  There will be 2 more panels to lay horizontal in the center but those will be mounted later because the support stucture will need to be beefed up.  The wood canopy structure will  be removed as it is being replaced with much stronger aluminum support structure. 

As always, Carter is making this up as he goes along trying to utilize the matterials at hand so there are some trials and errors. 

Despite the never ending challenges, Carter is  having a good time constructing his dream,
a ship that never stops for fuel,(NSF^2) and doesn't care which way the wind is blowing.

End of Day 1

What cha doing Diane?

Dinner?  Can I stay?

Even Momma Gater was seen cruising by the grill hoping for an invite for dinner! 
Ha!  I don't think so...


Day 2 - February 27th  -  Starboard Side

Started off the day by putting the existing 2 panels in the full upright position.

8 panels up!

Port side is lifted slightly to get maximum benefit of the position of the sun.

The last two panels  will be mounted in the center slots on each side at a later date once Carter has beefed up the support stucture a bit.

It was back to the metals shop for more of the aluminum for the support system.  As I stated earlier, most of the wood support is coming out.  Also, we will be installing linear actuators next to raise and lower the panels remotely from the cockpit.